Tuesday, November 3, 2009
Process to convert tab delimited to excel then back to tab delimited
(1) Open tab delimited file in excel
(2) Specify file origin as 936:Chinese Simplified (GB2312)

(3) Specify tab Delimited

(4) Click Finish
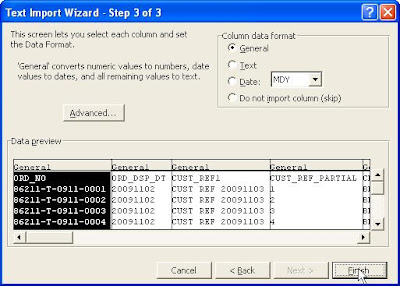
(5) After finishing with editing, save as Unicode Text

(2) Specify file origin as 936:Chinese Simplified (GB2312)

(3) Specify tab Delimited

(4) Click Finish

(5) After finishing with editing, save as Unicode Text

Oracle Listener lsnrctl commands
From Burleson Consulting
The following is from the bestselling book Oracle Utilities: Using Hidden Programs, Import/Export, SQL Loader, oradebug, Dbverify, Tkprof and More today and receive 30% off plus immediate access to the Online Code Depot!
Here we see the lsnrctl command in action:
$ lsnrctl
LSNRCTL for Solaris: Version 9.2.0.1.0 - Production on 30-JAN-2003 11:54:13
(c) Copyright 1998 Oracle Corporation. All rights reserved.
Welcome to LSNRCTL, type "help" for information.
LSNRCTL> help
>>>>>>>>>>>>>>>>>>>>>>>>>>>>>>>>>>>>>>>>>>>>>>
The following lsnrctl operations are available
An asterisk (*) denotes a modifier or extended command:
start stop status
services version reload
save_config trace spawn
dbsnmp_start dbsnmp_stop dbsnmp_status
change_password quit exit
set* show*
>>>>>>>>>>>>>>>>>>>>>>>>>>>>>>>>>>>>>>>>>>>>>>>
The following commands are used to manage the listener:
· start – Starts the listener with the name specified, otherwise LISTENER will be used. For Windows systems, the listener can also be started from the Control Panel.
· stop – Stops the listener. For Windows systems, the listener can also be stopped from the Control Panel.
· status – Provides status information about the listener, including start date, uptime, and trace level.
· services – Displays each service available, along with the connection history.
· version – Displays the version information of the listener.
· reload – Forces a read of the configuration file in order for new settings to take effect without stopping and starting the listener.
· save_config – Creates a backup of the existing listener.ora file and saves changes to the current version.
· trace – Sets the trace level to one of the following – OFF, USER, ADMIN, or SUPPORT.
· spawn – Spawns a program that runs with an alias in the listener.ora file.
· dbsnmp_start – Starts the DBSNMP subagent.
· dbsnmp_stop – Stops the DBSNMP subagent.
· dbsnmp_status – Displays the status of the DBSNMP subagent.
· change_password – Sets a new password for the listener.
· quit and exit – Exits the utility.
· set – Changes the value of any parameter. Everything that can be shown can be set.
show – Displays current parameter settings.
Monday, November 2, 2009
Oracle 10g Installation Notes
Your database configuration files have been installed in C:\oracle\product\10.2.0 while other components selected for installation have been installed in C:\oracle\product\10.2.0\db_1. Be cautious not to accidentally delete these configuration files.
The iSQL*Plus URL is:
http://MEMINE:5560/isqlplus
The iSQL*Plus DBA URL is:
http://MEMINE:5560/isqlplus/dba
The iSQL*Plus URL is:
http://MEMINE:5560/isqlplus
The iSQL*Plus DBA URL is:
http://MEMINE:5560/isqlplus/dba
Configuring Microsoft LoopBack Adapter
From Lazy Dba Site
This is how you install the loopback adapter. Try it. It worked well
fine for me !!
~~~~~~~~~~~~~~~~~~~~~~~~~~~~~~~~~~~~~~~~~~~~~~~~~~~
2.4.5.4 Installing a Loopback Adapter on Windows 2003 or Windows XP
-------------------------------------------------------------------
1. From the Start menu, select Control Panel.
2. Double-click Add Hardware to start the Add Hardware wizard.
3. On the Welcome screen, click Next.
4. On the Is the hardware connected? screen, select Yes, I have already connected the hardware, and click Next.
5. On the The following hardware is already installed on your computer screen, select Add a new hardware device, and click Next.
6. On the The wizard can help you install other hardware screen, select Install the hardware that I manually select from a list, and click Next.
7. From the list, select the type of hardware you are installing screen, select Network adapters, and click Next.
8. On the Select Network Adapter screen, make the following selections: Manufacturer: select Microsoft.
Network Adapter: select Microsoft Loopback Adapter.
9. Click Next.
10. On the The wizard is ready to install your hardware screen, click
Next.
11. On the Completing the Add Hardware Wizard screen, click Finish.
12. If you are using Windows 2003, restart your computer.
13. Right-click My Network Places on the desktop and choose Properties.
This displays the Network Connections control panel.
14. Right-click the connection that was just created. This is usually
named "Local Area Connection 2". Choose Properties.
15. On the General tab, select Internet Protocol (TCP/IP), and click
Properties.
16. In the Properties dialog, do the following:
IP Address: Enter a non-routable IP for the loopback adapter. Oracle
recommends the following non-routable addresses:
192.168.x.x (x is any value between 1 and 255)
10.10.10.10
a. Subnet mask: Enter 255.255.255.0.
b. Leave all other fields empty.
c. Click OK.
17. Click OK.
18. Click OK in the Local Area Connection 2 Properties dialog.
19. Restart the computer.
20. Add a line to the C:\windows\system32\drivers\etc\hosts file with
the following format, after the localhost line:
IP_address hostname.domainname hostname
where:
IP_address is the non-routable IP address you entered in step 16.
hostname is the name of the computer.
domainname is the name of the domain.
For example:
10.10.10.10 mycomputer.mydomain.com mycomputer
21. Check the network configuration:
Open System Properties, and select the Computer Name tab. In Full
computer name, make sure you see the hostname and the domain name.
Click Change. In Computer name, you should see the hostname, and in Full
computer name, you should see the hostname and domain name.
Click More. In Primary DNS suffix of this computer, you should see the
domain name.
Sunday, November 1, 2009
Subscribe to:
Posts (Atom)