Resource from Victor Chen blog
Microsoft Visual Studio 2008 is by far one of my personal favorite Integrated Development Environments (IDE). However, it is also no secret some aspects of the IDE are overly bloated and therefore take forever to load or execute. One portion that drives me crazy is the time it takes Visual Studio 2008 to load up. By default (after a standard installation), Visual Studio 2008 opens the start page, which a screen containing recently open solutions as well as links to MSDN containing latest Microsoft programming news. I never looked at the news and instead always immediately opened a solution.
Now, I have run across a setting buried deep in the options that allows this to be changed to any one of following options:
Open Home Page
Load last loaded solution
Show Open Project dialog box
Show New Project dialog box
Show empty environment
Show Start Page
I chose “Show Open Project dialog box” which for my needs makes the most sense. Nearly 95% of my time I open Visual Studio, my aim is to add new features or fix bugs. It loads blazing fast as compared to”Open Home Page” or “Show Start Page” because no overheard is required to visit the MSDN website.
To get to the dialog box, go to Tools > Options. Once in the dialog box, you go to Environment > Startup. Simply use the Dropdown Box and select your desired startup option.
If you do make a change (or have made a change prior to reading this article), what setting do you use?
Monday, March 29, 2010

Wednesday, November 18, 2009
Trying to resolve ODP error
Getting this error
The type 'Oracle.DataAccess.Client.OracleConnection' exists in both 'c:\WINDOW\assembly\GAC_32\Oracle.DataAccess\2.102.2.20_89b483f429c47342\Oracle.DataAccess.dll' and 'c:\WINDOWS\assembly\GAC\Oracle.DataAccess\1.102.2.20_89b483f429c47342\Oracle.DataAccess.dll'
It goes on for Oracle.DataAccess.Client.OracleCommand, OracleDataAccess.Client.OracleDataAdapter
Read somewhere need to ungac one of them via
gacutil /u Policy.2.102.Oracle.DataAccess
Need to run gacutil from Visual Studio 2008 command prompt
More details how to run gacutil
I believe the version numbers changed a bit with the 10.2 release. It sounds to me like you still have the old Oracle.DataAccess.dll file referenced in the GAC. What I would try is to remove all references that are in the GAC using the gacutil that comes with the .NET Framework 2.0 SDK. If you use the .NET 1.1 gacutil, you'll get an error when trying to work with the .NET 2.0 DLL's. To remove the references, you'll have to execute something like this:
REM Remove GAC Entries
gacutil /u Oracle.DataAccess
gacutil /u Policy.9.2.Oracle.DataAccess
gacutil /u Policy.10.1.Oracle.DataAccess
gacutil /u Policy.10.2.Oracle.DataAccess
This will remove all your GAC entries, including the policies.
Then, add the references from the new ODP.NET like this:
REM Update .NET GAC (1.1 and 2.0)
gacutil.exe /i\Client\10.2.0.1b\odp.net\bin\1.x\Oracle.DataAccess.dll /f
gacutil.exe /i\Client\10.2.0.1b\odp.net\bin\2.x\Oracle.DataAccess.dll /f
gacutil.exe /i\Client\10.2.0.1b\odp.net\PublisherPolicy\1.x\Policy.9.2.Oracle.DataAccess.dll
gacutil.exe /i\Client\10.2.0.1b\odp.net\PublisherPolicy\1.x\Policy.10.2.Oracle.DataAccess.dll
where= The path to your Oracle Home
These commands will add the references to the GAC for .NET 1.1 and 2.0. Also, if you have tools built with references to the previous versions, the Policy entries will direct those references to use the latest library. You may be able to omit the install of the Policy.9.2.Oracle.DataAccess.dll if you have never used the Oracle 9.2 version ODP.NET in any of your tools.
I actually got most of this procedure from an Oracle document somewhere, but I can't seem to find it right now. It might be in an FAQ somewhere...
Finally the solution for me after a week of search and destroy
Check your references in web.config of the application, or machine.config/web.config of the machine. You have references to two versions of the dll, so remove the one you are not going to use.
The type 'Oracle.DataAccess.Client.OracleConnection' exists in both 'c:\WINDOW\assembly\GAC_32\Oracle.DataAccess\2.102.2.20_89b483f429c47342\Oracle.DataAccess.dll' and 'c:\WINDOWS\assembly\GAC\Oracle.DataAccess\1.102.2.20_89b483f429c47342\Oracle.DataAccess.dll'
It goes on for Oracle.DataAccess.Client.OracleCommand, OracleDataAccess.Client.OracleDataAdapter
Read somewhere need to ungac one of them via
gacutil /u Policy.2.102.Oracle.DataAccess
Need to run gacutil from Visual Studio 2008 command prompt
More details how to run gacutil
I believe the version numbers changed a bit with the 10.2 release. It sounds to me like you still have the old Oracle.DataAccess.dll file referenced in the GAC. What I would try is to remove all references that are in the GAC using the gacutil that comes with the .NET Framework 2.0 SDK. If you use the .NET 1.1 gacutil, you'll get an error when trying to work with the .NET 2.0 DLL's. To remove the references, you'll have to execute something like this:
REM Remove GAC Entries
gacutil /u Oracle.DataAccess
gacutil /u Policy.9.2.Oracle.DataAccess
gacutil /u Policy.10.1.Oracle.DataAccess
gacutil /u Policy.10.2.Oracle.DataAccess
This will remove all your GAC entries, including the policies.
Then, add the references from the new ODP.NET like this:
REM Update .NET GAC (1.1 and 2.0)
gacutil.exe /i
gacutil.exe /i
gacutil.exe /i
gacutil.exe /i
where
These commands will add the references to the GAC for .NET 1.1 and 2.0. Also, if you have tools built with references to the previous versions, the Policy entries will direct those references to use the latest library. You may be able to omit the install of the Policy.9.2.Oracle.DataAccess.dll if you have never used the Oracle 9.2 version ODP.NET in any of your tools.
I actually got most of this procedure from an Oracle document somewhere, but I can't seem to find it right now. It might be in an FAQ somewhere...
Finally the solution for me after a week of search and destroy
Check your references in web.config of the application, or machine.config/web.config of the machine. You have references to two versions of the dll, so remove the one you are not going to use.
Tuesday, November 10, 2009


Thursday, November 5, 2009
how to uninstall oracle 10g from windows xp
From : aricsblog.blogspot.com
Sunday, August 14, 2005
Oracle's installation utility has a nasty habit of leaving a lot of items behind. I wrote this up to document what I've found you need to do to uninstall Oracle 10g manually. This is specific to 10g and Windows XP. Removing 9i is very similar if I remember right, but who's using 9i anymore? ;-)
The first thing you should do, is go ahead and run the installation tool to do an uninstall. It probably will leave some things behind, but it's worth running. Then go through this list and remove anything it missed. This list is detailed enough though, that I believe even if you did not run the uninstallation tool, this would fully uninstall Oracle.
The most commonly missed item is to make sure you remove everything from the GAC because the uninstaller doesn't appear to. I get to that later, but if you wanted to know the largest source of uninstallation problems, it's libraries remaining in the GAC.
After running the supplied Oracle uninstallation utility (which may or may not do some or all of the following):
Stop any Oracle services that have been left running.
Start->Settings->Control Panel->Services
Look for any services with names starting with 'Oracle' and stop them.
Run regedit and delete the following keys (some may have slightly different names in your registry):
HKEY_CURRENT_USER\SOFTWARE\ORACLE
HKEY_LOCAL_MACHINE\SOFTWARE\ORACLE
HKEY_LOCAL_MACHINE\SYSTEM\CurrentControlSet\Services\EventLog\Application\Oracle.oracle
HKEY_LOCAL_MACHINE\SYSTEM\CurrentControlSet\Services\OracleDBConsole
HKEY_LOCAL_MACHINE\SYSTEM\CurrentControlSet\Services\Oracle10g_home
HKEY_LOCAL_MACHINE\SYSTEM\CurrentControlSet\Services\OraclService
Note that the services control panel will still show the old services until you reboot.
Delete the Oracle home directory
C:\Oracle
Delete the Oracle Program Files directory:
C:\Program Files\Oracle
Delete the Oracle Start Menu shortcuts directory:
C:\Documents and Settings\All Users\Start Menu\Programs\Oracle*
Where * indicates the name of your install. Look for and remove all Oracle directories from that location.
Remove Oracle refereces from the path. To edit your path go to:
Start->Settings->Control Panel->System->Advanced->Environment Variables
Edit both of the environment variables user PATH and system PATH. Remove any Oracle references in them.
Remove Oracle.DataAccess and any Polic.Oracle files from the GAC which is at:
C:\Windows\assembly\
There, now your system is Oracle free. If you are installing a new instance of Oracle (and not just an additional DB) I recommend you do this before any new Oracle installation.
Note: I used several other websites and searches as references when developing these steps, but I was unable to find any steps that covered all of the items for Oracle 10g so I assembled them here
Sunday, August 14, 2005
Oracle's installation utility has a nasty habit of leaving a lot of items behind. I wrote this up to document what I've found you need to do to uninstall Oracle 10g manually. This is specific to 10g and Windows XP. Removing 9i is very similar if I remember right, but who's using 9i anymore? ;-)
The first thing you should do, is go ahead and run the installation tool to do an uninstall. It probably will leave some things behind, but it's worth running. Then go through this list and remove anything it missed. This list is detailed enough though, that I believe even if you did not run the uninstallation tool, this would fully uninstall Oracle.
The most commonly missed item is to make sure you remove everything from the GAC because the uninstaller doesn't appear to. I get to that later, but if you wanted to know the largest source of uninstallation problems, it's libraries remaining in the GAC.
After running the supplied Oracle uninstallation utility (which may or may not do some or all of the following):
Stop any Oracle services that have been left running.
Start->Settings->Control Panel->Services
Look for any services with names starting with 'Oracle' and stop them.
Run regedit and delete the following keys (some may have slightly different names in your registry):
HKEY_CURRENT_USER\SOFTWARE\ORACLE
HKEY_LOCAL_MACHINE\SOFTWARE\ORACLE
HKEY_LOCAL_MACHINE\SYSTEM\CurrentControlSet\Services\EventLog\Application\Oracle.oracle
HKEY_LOCAL_MACHINE\SYSTEM\CurrentControlSet\Services\OracleDBConsole
HKEY_LOCAL_MACHINE\SYSTEM\CurrentControlSet\Services\Oracle10g_home
HKEY_LOCAL_MACHINE\SYSTEM\CurrentControlSet\Services\OraclService
Note that the services control panel will still show the old services until you reboot.
Delete the Oracle home directory
C:\Oracle
Delete the Oracle Program Files directory:
C:\Program Files\Oracle
Delete the Oracle Start Menu shortcuts directory:
C:\Documents and Settings\All Users\Start Menu\Programs\Oracle*
Where * indicates the name of your install. Look for and remove all Oracle directories from that location.
Remove Oracle refereces from the path. To edit your path go to:
Start->Settings->Control Panel->System->Advanced->Environment Variables
Edit both of the environment variables user PATH and system PATH. Remove any Oracle references in them.
Remove Oracle.DataAccess and any Polic.Oracle files from the GAC which is at:
C:\Windows\assembly\
There, now your system is Oracle free. If you are installing a new instance of Oracle (and not just an additional DB) I recommend you do this before any new Oracle installation.
Note: I used several other websites and searches as references when developing these steps, but I was unable to find any steps that covered all of the items for Oracle 10g so I assembled them here
Wednesday, November 4, 2009
Problem in UTF-8 support on CSV/EXCEL
It seems like everyone is having this issue. This is very common problem and i have been looking for its solution for a long time too. I have found a solution and have tested it to make sure it works for almost all languages.
This is problem with Excel NOT the data format that is exported. Here are the steps
1- download the exported CSV/XLS file from your website.
2- Open Excel 2007
3- Open a new file
4- Click the Data Menu option
5- Click "From Text" button
6- Select the file you downloaded
7- Make sure "Delimited" is selected and Press Next
8- Check the delimiter characters that you know are in your file like Comma or Tab or whatever is in your case. You can select more than one
9- Proceed to Next Step and Finich
10- Your excel file will be ready with all you data displayed correctly
I hope that helps someone who has been frustrated on this.
Regards
Nauman
This is problem with Excel NOT the data format that is exported. Here are the steps
1- download the exported CSV/XLS file from your website.
2- Open Excel 2007
3- Open a new file
4- Click the Data Menu option
5- Click "From Text" button
6- Select the file you downloaded
7- Make sure "Delimited" is selected and Press Next
8- Check the delimiter characters that you know are in your file like Comma or Tab or whatever is in your case. You can select more than one
9- Proceed to Next Step and Finich
10- Your excel file will be ready with all you data displayed correctly
I hope that helps someone who has been frustrated on this.
Regards
Nauman
Tuesday, November 3, 2009
IIS 5.1 in XP PRO SP3 (Login password Popup)
Troubleshooting HTTP 401 errors in IIS
Is there an index.htm or default.htm under C:\Inetpub\www ?
If not, put one there and see what happens.
or
(1) Launch inetmgr and right click on site
(2) Go to Properties
(3) Go to Directory Security Tab


If this doesn't work then perhaps
Check on iisstart.asp or localstart.asp, I believe the anonymous auth is disable at file level as well
Or
Uninstall Framework 3.5, 3.0 and 2.0 and reinstalled IIS.
That is becoz IE auto login for you, mozilla won't do that.
So again make sure you enabled anonymous authentication and ensure the resource file can be read by the anonymous account, which is iusr_computername by default.
Is there an index.htm or default.htm under C:\Inetpub\www ?
If not, put one there and see what happens.
or
(1) Launch inetmgr and right click on site
(2) Go to Properties
(3) Go to Directory Security Tab
(4) Click on Edit under Authentication and Access Control
(5) Select checkbox that says Enable Anonymous Access
Screen shot follows :


If this doesn't work then perhaps
Check on iisstart.asp or localstart.asp, I believe the anonymous auth is disable at file level as well
Or
Uninstall Framework 3.5, 3.0 and 2.0 and reinstalled IIS.
That is becoz IE auto login for you, mozilla won't do that.
So again make sure you enabled anonymous authentication and ensure the resource file can be read by the anonymous account, which is iusr_computername by default.
Process to convert tab delimited to excel then back to tab delimited
(1) Open tab delimited file in excel
(2) Specify file origin as 936:Chinese Simplified (GB2312)

(3) Specify tab Delimited

(4) Click Finish
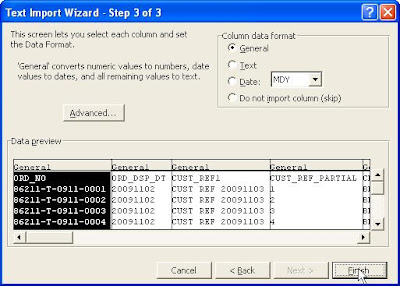
(5) After finishing with editing, save as Unicode Text

(2) Specify file origin as 936:Chinese Simplified (GB2312)

(3) Specify tab Delimited

(4) Click Finish

(5) After finishing with editing, save as Unicode Text

Oracle Listener lsnrctl commands
From Burleson Consulting
The following is from the bestselling book Oracle Utilities: Using Hidden Programs, Import/Export, SQL Loader, oradebug, Dbverify, Tkprof and More today and receive 30% off plus immediate access to the Online Code Depot!
Here we see the lsnrctl command in action:
$ lsnrctl
LSNRCTL for Solaris: Version 9.2.0.1.0 - Production on 30-JAN-2003 11:54:13
(c) Copyright 1998 Oracle Corporation. All rights reserved.
Welcome to LSNRCTL, type "help" for information.
LSNRCTL> help
>>>>>>>>>>>>>>>>>>>>>>>>>>>>>>>>>>>>>>>>>>>>>>
The following lsnrctl operations are available
An asterisk (*) denotes a modifier or extended command:
start stop status
services version reload
save_config trace spawn
dbsnmp_start dbsnmp_stop dbsnmp_status
change_password quit exit
set* show*
>>>>>>>>>>>>>>>>>>>>>>>>>>>>>>>>>>>>>>>>>>>>>>>
The following commands are used to manage the listener:
· start – Starts the listener with the name specified, otherwise LISTENER will be used. For Windows systems, the listener can also be started from the Control Panel.
· stop – Stops the listener. For Windows systems, the listener can also be stopped from the Control Panel.
· status – Provides status information about the listener, including start date, uptime, and trace level.
· services – Displays each service available, along with the connection history.
· version – Displays the version information of the listener.
· reload – Forces a read of the configuration file in order for new settings to take effect without stopping and starting the listener.
· save_config – Creates a backup of the existing listener.ora file and saves changes to the current version.
· trace – Sets the trace level to one of the following – OFF, USER, ADMIN, or SUPPORT.
· spawn – Spawns a program that runs with an alias in the listener.ora file.
· dbsnmp_start – Starts the DBSNMP subagent.
· dbsnmp_stop – Stops the DBSNMP subagent.
· dbsnmp_status – Displays the status of the DBSNMP subagent.
· change_password – Sets a new password for the listener.
· quit and exit – Exits the utility.
· set – Changes the value of any parameter. Everything that can be shown can be set.
show – Displays current parameter settings.
The following is from the bestselling book Oracle Utilities: Using Hidden Programs, Import/Export, SQL Loader, oradebug, Dbverify, Tkprof and More today and receive 30% off plus immediate access to the Online Code Depot!
Here we see the lsnrctl command in action:
$ lsnrctl
LSNRCTL for Solaris: Version 9.2.0.1.0 - Production on 30-JAN-2003 11:54:13
(c) Copyright 1998 Oracle Corporation. All rights reserved.
Welcome to LSNRCTL, type "help" for information.
LSNRCTL> help
>>>>>>>>>>>>>>>>>>>>>>>>>>>>>>>>>>>>>>>>>>>>>>
The following lsnrctl operations are available
An asterisk (*) denotes a modifier or extended command:
start stop status
services version reload
save_config trace spawn
dbsnmp_start dbsnmp_stop dbsnmp_status
change_password quit exit
set* show*
>>>>>>>>>>>>>>>>>>>>>>>>>>>>>>>>>>>>>>>>>>>>>>>
The following commands are used to manage the listener:
· start – Starts the listener with the name specified, otherwise LISTENER will be used. For Windows systems, the listener can also be started from the Control Panel.
· stop – Stops the listener. For Windows systems, the listener can also be stopped from the Control Panel.
· status – Provides status information about the listener, including start date, uptime, and trace level.
· services – Displays each service available, along with the connection history.
· version – Displays the version information of the listener.
· reload – Forces a read of the configuration file in order for new settings to take effect without stopping and starting the listener.
· save_config – Creates a backup of the existing listener.ora file and saves changes to the current version.
· trace – Sets the trace level to one of the following – OFF, USER, ADMIN, or SUPPORT.
· spawn – Spawns a program that runs with an alias in the listener.ora file.
· dbsnmp_start – Starts the DBSNMP subagent.
· dbsnmp_stop – Stops the DBSNMP subagent.
· dbsnmp_status – Displays the status of the DBSNMP subagent.
· change_password – Sets a new password for the listener.
· quit and exit – Exits the utility.
· set – Changes the value of any parameter. Everything that can be shown can be set.
show – Displays current parameter settings.
Monday, November 2, 2009
Oracle 10g Installation Notes
Your database configuration files have been installed in C:\oracle\product\10.2.0 while other components selected for installation have been installed in C:\oracle\product\10.2.0\db_1. Be cautious not to accidentally delete these configuration files.
The iSQL*Plus URL is:
http://MEMINE:5560/isqlplus
The iSQL*Plus DBA URL is:
http://MEMINE:5560/isqlplus/dba
The iSQL*Plus URL is:
http://MEMINE:5560/isqlplus
The iSQL*Plus DBA URL is:
http://MEMINE:5560/isqlplus/dba
Configuring Microsoft LoopBack Adapter
From Lazy Dba Site
This is how you install the loopback adapter. Try it. It worked well
fine for me !!
~~~~~~~~~~~~~~~~~~~~~~~~~~~~~~~~~~~~~~~~~~~~~~~~~~~
2.4.5.4 Installing a Loopback Adapter on Windows 2003 or Windows XP
-------------------------------------------------------------------
1. From the Start menu, select Control Panel.
2. Double-click Add Hardware to start the Add Hardware wizard.
3. On the Welcome screen, click Next.
4. On the Is the hardware connected? screen, select Yes, I have already connected the hardware, and click Next.
5. On the The following hardware is already installed on your computer screen, select Add a new hardware device, and click Next.
6. On the The wizard can help you install other hardware screen, select Install the hardware that I manually select from a list, and click Next.
7. From the list, select the type of hardware you are installing screen, select Network adapters, and click Next.
8. On the Select Network Adapter screen, make the following selections: Manufacturer: select Microsoft.
Network Adapter: select Microsoft Loopback Adapter.
9. Click Next.
10. On the The wizard is ready to install your hardware screen, click
Next.
11. On the Completing the Add Hardware Wizard screen, click Finish.
12. If you are using Windows 2003, restart your computer.
13. Right-click My Network Places on the desktop and choose Properties.
This displays the Network Connections control panel.
14. Right-click the connection that was just created. This is usually
named "Local Area Connection 2". Choose Properties.
15. On the General tab, select Internet Protocol (TCP/IP), and click
Properties.
16. In the Properties dialog, do the following:
IP Address: Enter a non-routable IP for the loopback adapter. Oracle
recommends the following non-routable addresses:
192.168.x.x (x is any value between 1 and 255)
10.10.10.10
a. Subnet mask: Enter 255.255.255.0.
b. Leave all other fields empty.
c. Click OK.
17. Click OK.
18. Click OK in the Local Area Connection 2 Properties dialog.
19. Restart the computer.
20. Add a line to the C:\windows\system32\drivers\etc\hosts file with
the following format, after the localhost line:
IP_address hostname.domainname hostname
where:
IP_address is the non-routable IP address you entered in step 16.
hostname is the name of the computer.
domainname is the name of the domain.
For example:
10.10.10.10 mycomputer.mydomain.com mycomputer
21. Check the network configuration:
Open System Properties, and select the Computer Name tab. In Full
computer name, make sure you see the hostname and the domain name.
Click Change. In Computer name, you should see the hostname, and in Full
computer name, you should see the hostname and domain name.
Click More. In Primary DNS suffix of this computer, you should see the
domain name.
This is how you install the loopback adapter. Try it. It worked well
fine for me !!
~~~~~~~~~~~~~~~~~~~~~~~~~~~~~~~~~~~~~~~~~~~~~~~~~~~
2.4.5.4 Installing a Loopback Adapter on Windows 2003 or Windows XP
-------------------------------------------------------------------
1. From the Start menu, select Control Panel.
2. Double-click Add Hardware to start the Add Hardware wizard.
3. On the Welcome screen, click Next.
4. On the Is the hardware connected? screen, select Yes, I have already connected the hardware, and click Next.
5. On the The following hardware is already installed on your computer screen, select Add a new hardware device, and click Next.
6. On the The wizard can help you install other hardware screen, select Install the hardware that I manually select from a list, and click Next.
7. From the list, select the type of hardware you are installing screen, select Network adapters, and click Next.
8. On the Select Network Adapter screen, make the following selections: Manufacturer: select Microsoft.
Network Adapter: select Microsoft Loopback Adapter.
9. Click Next.
10. On the The wizard is ready to install your hardware screen, click
Next.
11. On the Completing the Add Hardware Wizard screen, click Finish.
12. If you are using Windows 2003, restart your computer.
13. Right-click My Network Places on the desktop and choose Properties.
This displays the Network Connections control panel.
14. Right-click the connection that was just created. This is usually
named "Local Area Connection 2". Choose Properties.
15. On the General tab, select Internet Protocol (TCP/IP), and click
Properties.
16. In the Properties dialog, do the following:
IP Address: Enter a non-routable IP for the loopback adapter. Oracle
recommends the following non-routable addresses:
192.168.x.x (x is any value between 1 and 255)
10.10.10.10
a. Subnet mask: Enter 255.255.255.0.
b. Leave all other fields empty.
c. Click OK.
17. Click OK.
18. Click OK in the Local Area Connection 2 Properties dialog.
19. Restart the computer.
20. Add a line to the C:\windows\system32\drivers\etc\hosts file with
the following format, after the localhost line:
IP_address hostname.domainname hostname
where:
IP_address is the non-routable IP address you entered in step 16.
hostname is the name of the computer.
domainname is the name of the domain.
For example:
10.10.10.10 mycomputer.mydomain.com mycomputer
21. Check the network configuration:
Open System Properties, and select the Computer Name tab. In Full
computer name, make sure you see the hostname and the domain name.
Click Change. In Computer name, you should see the hostname, and in Full
computer name, you should see the hostname and domain name.
Click More. In Primary DNS suffix of this computer, you should see the
domain name.
Sunday, November 1, 2009
Saturday, October 31, 2009
Friday, October 30, 2009
Friday, October 23, 2009
Thursday, October 22, 2009
ODP.NET Developer's Guide
A good book. Examples in Visual Basic. Can be converted to c# quite easily.
ODP.NET Developer's Guide
Oracle Database 10g Development with Visual Studio 2005 and Oracle Data Provide for .Net
A practical guide for developers working with Oracle Data Provider for .Net and the Oracle Tools for Visual Studio 2005
Jagadish Chatarji Pulakhandam
Sunitha Paruchuri
PACKT Publishing
Birmingham-Mumbai
ODP.NET Developer's Guide
Oracle Database 10g Development with Visual Studio 2005 and Oracle Data Provide for .Net
A practical guide for developers working with Oracle Data Provider for .Net and the Oracle Tools for Visual Studio 2005
Jagadish Chatarji Pulakhandam
Sunitha Paruchuri
PACKT Publishing
Birmingham-Mumbai
Subscribe to:
Posts (Atom)